How to Calibrate a Probe Thermometer (And Why You Can't Skip It)
Your probe thermometer is the single most important food safety tool in your kitchen. Every temperature check you take — deliveries, cooking, cooling, hot holding — depends on it reading accurately.
But here’s the thing: thermometers drift. Drops, temperature swings, normal wear — they all push readings off over time. A probe that’s 3°C out could tell you chicken is cooked when it isn’t. That’s not a minor inconvenience. That’s a food poisoning case waiting to happen.
Calibration fixes this. It takes less than two minutes, and it’s one of the first things an Environmental Health Officer will ask about during an inspection.
Why Calibration Matters
An uncalibrated thermometer can read several degrees higher or lower than the actual temperature. In food safety, those degrees matter.
Consider the numbers:
- 75°C is the safe core cooking temperature for most foods in the UK
- A thermometer reading 3°C high shows 75°C when the food is actually at 72°C
- At 72°C, harmful bacteria like Salmonella and E. coli may survive
You’d serve that food thinking it was safe. It wouldn’t be.
The same applies to chilled storage. Your fridge should hold food at 8°C or below (ideally under 5°C). A thermometer reading 2°C low shows 4°C when the actual temperature is 6°C. Still legal, but you’ve lost your safety margin — and if it drifts further, you’re storing food in the danger zone without knowing it.
Calibration isn’t bureaucracy. It’s the check that keeps every other temperature check honest.
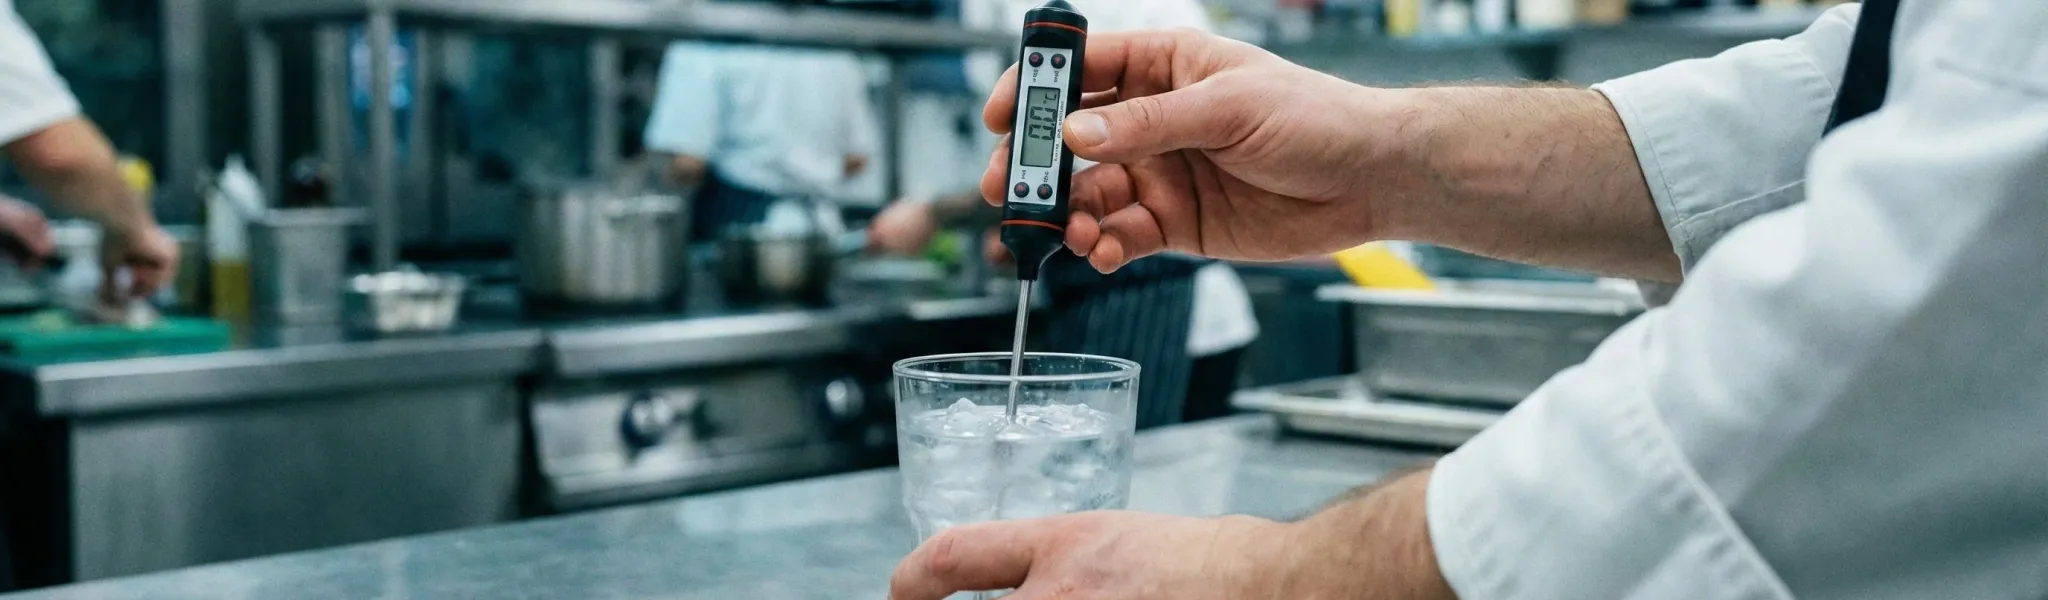
The Ice Point Method
This is the standard calibration method for food businesses. It’s simple, reliable, and you can do it with things already in your kitchen.
What you need
- A tall glass or insulated container
- Crushed or shaved ice (not cubes — surface contact matters)
- Cold tap water
- Your probe thermometer
Steps
- Fill the glass with crushed ice to the top
- Add cold water until it just reaches the surface of the ice — don’t flood it
- Stir gently for about 30 seconds to equalise the temperature
- Insert the probe into the centre of the ice slurry, making sure the sensor tip is fully submerged and not touching the sides or bottom
- Wait for the reading to stabilise (usually 30–60 seconds)
- It should read 0°C ±1°C
If it reads between -1°C and 1°C, your probe is accurate. Record the result and carry on.
If it’s outside that range, you have two options depending on your thermometer:
- Adjustable probes: Use the calibration screw or digital offset function to set it to 0°C
- Non-adjustable probes: Note the offset (e.g., “reads +2°C”) and factor it into your checks — or better yet, replace the thermometer
Common mistakes
- Using ice cubes instead of crushed ice. Large cubes leave air gaps. The water between them may not be at 0°C.
- Not enough ice. The ratio should be mostly ice with just enough water to fill gaps. If it looks like cold water with a few ice cubes floating in it, start again.
- Touching the glass. The sides and bottom of the container aren’t at 0°C. Keep the probe tip in the centre of the slurry.
The Boiling Point Method
Less commonly used day-to-day, but useful as a second reference point — especially if you suspect your probe is inaccurate at higher temperatures.
Steps
- Bring a pot of water to a full rolling boil
- Insert the probe tip into the boiling water, keeping it away from the sides and bottom of the pot
- Wait for the reading to stabilise
- It should read 100°C ±1°C
At sea level in the UK, water boils at 100°C. If you’re at altitude (unlikely to be significant in most of the UK, but relevant in some highland locations), the boiling point drops slightly — roughly 1°C for every 300 metres of elevation.
When to use this method
- When you want to verify accuracy across the full range
- When the ice point checks out but you’re getting unexpected readings on hot food
- As an occasional secondary check alongside your regular ice point calibration
A note on safety: boiling water and steam cause burns. Use care when inserting and removing the probe. Hold the thermometer by its handle, not the stem.
How Often Should You Calibrate?
The short answer: at least once a week. The better answer: daily, if your probes get heavy use.
Probes that are used dozens of times per service, dropped occasionally, or moved between very hot and very cold environments should be checked more frequently. The more stress a probe takes, the faster it drifts.
Here’s a practical schedule:
| Probe usage | Calibration frequency |
|---|---|
| Light use (a few checks per day) | Weekly |
| Moderate use (regular service checks) | Every 2–3 days |
| Heavy use (high-volume kitchen, multiple services) | Daily |
| After being dropped or damaged | Immediately |
Many food businesses build calibration into their opening routine. It takes 90 seconds and gives you confidence in every reading for the rest of the day.
Keeping Calibration Records
When an EHO visits, one of the standard questions is: “When was your probe last calibrated?”
“We do it regularly” isn’t good enough. You need a log. You can download our free Thermometer Calibration Log template to get started — it covers everything an EHO expects to see.
Your calibration record should capture:
- Date and time of the check
- Thermometer ID (if you have multiple probes — and you should label them)
- Method used (ice point or boiling point)
- Reading obtained (the actual number, not just “pass”)
- Action taken (adjusted, noted offset, or replaced)
- Who did it (name or initials)
This doesn’t need to be complicated. A simple paper log works. A digital record is better — it’s harder to lose, easier to search, and shows EHOs you take compliance seriously.
If you’re already using Forkto’s digital checklists for your daily food safety checks, adding a calibration step to your opening procedure is straightforward. The record is timestamped, tied to a staff member, and stored automatically — no clipboard required. You can also use Forkto’s temperature monitoring features to automate your temperature checks and get alerts when readings fall outside safe ranges.
When to Replace Your Thermometer
Calibration can only do so much. If your probe consistently reads outside the ±1°C tolerance, or if the offset keeps changing, it’s time for a new one.
Replace your thermometer when:
- It won’t calibrate. You adjust it, but it drifts back within days.
- The offset is large. Anything beyond ±2°C is unreliable even with compensation.
- It’s physically damaged. Cracked display, bent probe, loose sensor tip, water ingress.
- Response time has slowed. If it takes significantly longer to stabilise than it used to, the sensor may be degrading.
- It’s old. Even well-maintained probes don’t last forever. If yours has been in daily service for years, budget for a replacement.
A decent digital probe thermometer costs £15–£30. That’s nothing compared to the cost of a food poisoning incident, a failed inspection, or a closure order.
Buy at least two probes. You need a backup, and having two lets you cross-check readings if something seems off.
Making Calibration Part of Your Routine
The businesses that stay on top of calibration are the ones that build it into their existing workflow rather than treating it as a separate task.
Practical tips:
- Tie it to opening checks. Calibrate while the kitchen is being set up, before any food checks happen.
- Keep a dedicated ice point kit. A small insulated cup and a bag of crushed ice in the freezer. Remove the friction and it gets done.
- Label your probes. “Probe 1”, “Probe 2” — simple, but essential for tracking which probe was calibrated when.
- Set a reminder. Whether that’s a wall chart, a recurring task, or a step in your digital checks, make sure it doesn’t rely on someone remembering.
Calibration isn’t glamorous. Nobody opens a restaurant because they’re passionate about ice point verification. But it’s the foundation everything else sits on. Every temperature record in your HACCP plan is only as reliable as the thermometer that took it.
Two minutes a day. That’s all it takes to know your readings are right.
Need a calibration log? Download our free Thermometer Calibration Log — a printable template that captures date, thermometer ID, method, reading, pass/fail, corrective action, and initials for every check.
Forkto helps UK food businesses manage temperature monitoring, daily checks, and compliance records — all in one platform. See how it works →
Food safety, sorted
Stop running food safety on paper
Forkto turns daily checks, temperature logs, HACCP and audits into a few taps on a phone — so your team stays consistent and you're always ready for the EHO.
14-day free trial · No card required
Related guides
Cross-Contamination Prevention in Commercial Kitchens
Learn how to prevent cross-contamination in your commercial kitchen. Covers bacterial, chemical, physical and allergen risks plus what EHOs look for.
We Analysed 475,326 UK Food Hygiene Ratings. Here's Why Businesses Fail.
We analysed 475,326 food hygiene ratings to find out why businesses score below 5. The number one reason isn't dirty kitchens — it's paperwork.
The Real Cost of Food Safety Non-Compliance
What non-compliance really costs UK food businesses: fines up to £3m, prosecution, closure, lost customers and insurance problems — with real cases.